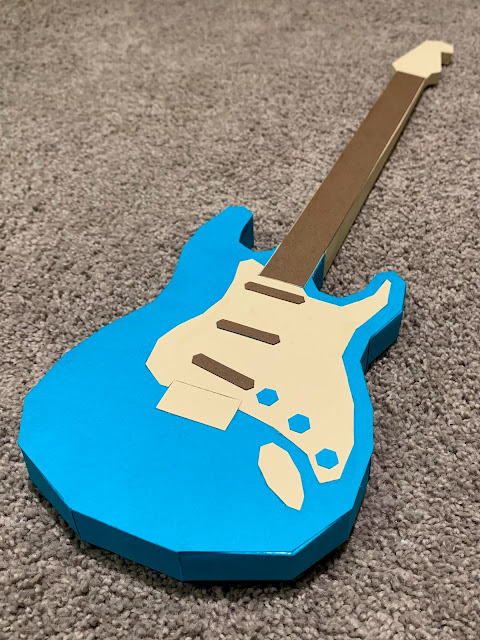
Paper Guitar Prototype
Before we get into the blog post, I’d like to give a content warning for mild injury (no blood).
Music is incredibly important to me, and often use it as a way to define myself. I am a guitarist, singer, and a music teacher. I’m incredibly passionate about the bands I like. (My favourites are All Time Low, Story Untold, Set It Off, and As It Is.) I can also be a huge music nerd at times.
To reflect this, I decided to make a miniature guitar, modelled after my own electric guitar (which I painted as an art project last year).
Originally, I thought it would be cool to be able to play a little tune on the paper model. Elastic bands could work for relatively low-tension strings, and paper clips would probably secure them well enough.
I had a great idea of what song I could play, too: Cinderblock Garden by All Time Low, or at least the start of the riff. Even before I started learning guitar, I knew I wanted to learn that song, and it’s still one of my favourites to play. In addition to that, I associate that song with my girlfriend, and she associates it with me, adding to its importance for me.
Sadly, when I experimented, I found that I had underestimated my rubber bands. They needed more tension than I expected to get a good sound. The elastic band also kept slipping from its paper clip clamp, despite the many ways I had tried to attach it.
So I decided to ditch the song part of the idea :(
I moved on to actually building a guitar out of paper. All was going well, but when I got to the gluing, I realized how tiny I had made the tabs. Up to that point, I hadn't payed much attention to their size.
So I went back on my computer to resize the model and remake the tabs.
The second attempt at the body of the guitar went much better, gluing included. I only had one mishap, a tab that got glued on the outside rather than the inside where it belongs.
I continued on to the neck and head of the guitar, but realized that my original plans were, one again, too tiny, and far too intricate.
I had to go back into Rhino again, this time to make a new model for the neck and head. The new model, while more simplistic and less accurate than my original design, worked near perfectly in paper.
I also learned how sharp my X-acto knife is by shaving off some skin. It didn’t bleed or hurt at all, but from that moment forwards, I payed a lot more attention to where my fingers were.
I glued on the pickguard, bridge, and jack, as well as the pickups and knobs.
After comparing it to my real electric guitar, I decided to add a fretboard and add darker paper to the pickups.
In the end, I’m quite proud of how it came out. That being said, I have a few adjustments I’d like to make.
- First off, I’d like to shorten the neck to be more proportionally accurate. I think it looks a bit like a bass right now.
- I’d also want to make the knobs more 3d, as well as white, to better match the original.
- I’m considering making the bridge 3d as well.
- If I could, I’d like to somehow add my painted design from the original to the model. Maybe drawing on the paper, maybe printing it on, maybe adding more paper cutouts, I'm not sure.
On the other side, with things I want to recreate next time, is the height of the pickups. I did that unintentionally, simply by layering paper to replace the teal on top of the pickguard with dark brown. I really like the effect this gives, it feels more accurate and realistic.
Sorry if this is on the long side. As I said, I can be a bit of a music nerd at times, and I wanted this build to be pretty comprehensive.
Anywhoo, thanks for reading, and I’ll see you next time
- Pete


Comments
Post a Comment